

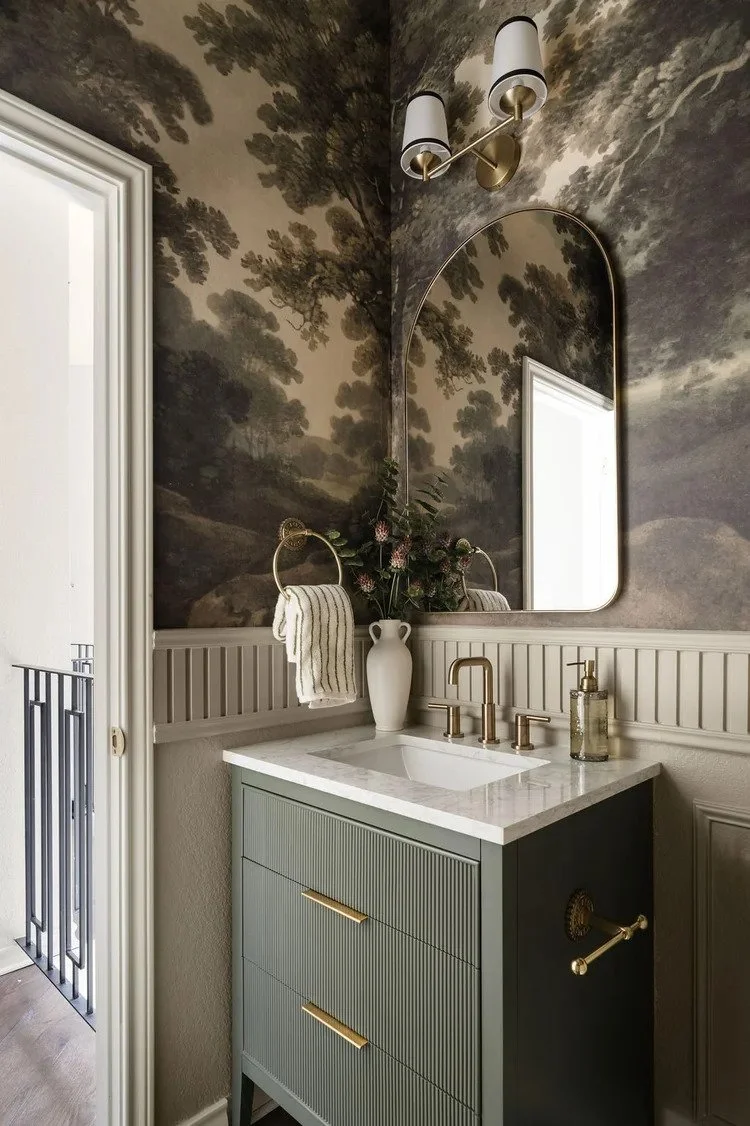
Custom Bathroom Design in Austin: Your Complete Interior Design Guide
Even the smallest bathroom can feel spacious, refined, and functional with the right design approach. Explore how thoughtful planning, smart storage, and elevated materials can transform your Austin bathroom into a serene, modern retreat.
Your bathroom is more than a functional space — it’s your personal sanctuary, a spa-like retreat where each day begins and ends. In Austin, where homes blend Hill Country warmth with contemporary sophistication, custom bathroom design has become essential for creating spaces that reflect both personal style and everyday lifestyle needs.
Whether you’re envisioning a luxurious master suite with a freestanding soaking tub, a sleek modern powder room, or a family-friendly bathroom that balances beauty with durability, custom design transforms ordinary rooms into extraordinary experiences. This guide walks you through everything you need to know about designing a bathroom that elevates your home and enhances your daily routine.
Custom Bathroom Design vs. Standard Renovations
What truly separates custom bathroom design from a standard remodel?
PERSONALIZATION, INTENTION, AND EXPERT GUIDANCE.
A typical renovation focuses on cosmetic updates or replacing fixtures with off-the-shelf options. Custom Bathroom Design in Austin, however, takes a holistic, lifestyle-driven approach. A designer evaluates how you use the space — from your morning rhythm to your evening wind-down — and creates a room that supports your habits, preferences, and long-term needs.
Every element is chosen with purpose:
Finishes that complement your home’s architecture
Lighting that creates the right mood at the right time
Storage that eliminates visual clutter
Layout that maximizes both flow and function
Custom design tells a cohesive, personal story — one that feels effortlessly yours.
Key Elements of Exceptional Bathroom Design
LAYOUT & SPACE PLANNING
A beautiful bathroom begins with thoughtful space planning. Even the most luxurious finishes can’t compensate for a layout that feels cramped or inefficient.
In Austin homes — from cozy bungalows to expansive Hill Country estates — space planning plays a critical role. Skilled designers maximize every square inch through strategic fixture placement, clever storage, and visual techniques that create a sense of spaciousness and calm.
Material Selection & Finishes
Materials shape both the aesthetic and the longevity of your bathroom.
Natural stone, porcelain, quartz, and custom cabinetry create distinctive looks while standing up to Austin’s humidity. Mixing textures — such as marble counters with textured tile or warm wood with cool metals — adds depth and dimension without overwhelming the senses.
Lighting Design
Lighting is one of the most transformative design elements.
A layered approach ensures functionality and ambiance:
Task lighting for grooming
Ambient lighting for overall illumination
Accent lighting to highlight architectural details
Natural light is always a bonus. Strategically placed windows or skylights bring in the Texas sun while preserving privacy. For windowless spaces, designers use reflective surfaces and warm, balanced fixtures to mimic daylight.
Storage Solutions
A serene bathroom requires thoughtful storage.
Custom solutions — floating vanities, recessed niches, lit medicine cabinets, and organized linen storage — keep essentials accessible yet out of sight. Designers tailor storage to your real, daily needs, creating harmony and order.
Austin-Specific Design Considerations
Inspired by Hill Country Aesthetics
Austin design often blends natural materials and organic textures that echo the local landscape — limestone, warm woods, earthy hues. These elements create spaces that feel grounded, warm, and timeless.
Climate & Durability
Austin’s heat and humidity make durability essential.
Porcelain tile, engineered stone, moisture-resistant cabinetry, and proper ventilation all ensure longevity.
Sustainability & Water Conservation
Eco-conscious design is increasingly important in Austin. Low-flow fixtures and smart water-saving technologies reduce usage without sacrificing experience.
Popular Bathroom Styles in Austin
Modern Minimalism – Clean lines, floating vanities, frameless glass, refined simplicity
Contemporary Farmhouse – Rustic charm with modern comforts and warm materials
Transitional Elegance – A blend of classic beauty and modern functionality
Spa-Inspired Luxury – Soothing palettes, natural materials, soaking tubs, and wellness features
The Custom Bathroom Design Process
● Initial Consultation & Vision Development
A conversation to understand your habits, frustrations, goals, and aesthetic preferences.
● Space Assessment & Measurement
Evaluating layout, plumbing, electrical, and structural elements to determine what’s possible.
● Concept Development & Presentation
Mood boards, 3D renderings, and material palettes help you visualize the space before construction.
● Material Selection & Procurement
Designers source elevated, high-quality materials — often from trade-only vendors.
● Project Management & Installation
Coordinating contractors, timelines, deliveries, and quality control ensures a seamless experience from start to finish.
Budgeting for Your Custom Bathroom
Custom design accommodates a range of budgets through thoughtful prioritization.
Investing in high-impact elements — quality fixtures, durable surfaces, and proper lighting — ensures long-term value.
Professional guidance helps you avoid costly mistakes, secure better pricing, and ensure that every detail is executed correctly.
Common Design Mistakes to Avoid
Insufficient lighting
Limited storage
Poor ventilation
Overly trendy selections
Incorrectly sized fixtures
Designers help you avoid these pitfalls while keeping the space functional and timeless.
Conclusion: Creating Your Dream Bathroom
A custom-designed bathroom elevates your daily life and enhances your home’s value. In Austin’s competitive market, thoughtful design stands out — and provides immediate comfort and long-term beauty.
At Claudia Pakes Design Studio, we specialize in creating refined, functional bathrooms with complete design and renovation support. From concept to completion, we handle every detail with care, integrity, and an unwavering commitment to exceptional design.

Bathroom Remodeling Austin: Creative Ideas for Small Bathrooms
Discover how modern layouts, elevated materials, and expert planning can transform even the smallest Austin bathroom into a beautifully functional retreat.
Beautifully designed, effortlessly delivered.
Small bathrooms may feel limiting at first glance, but with thoughtful design, they can become some of the most charming and functional spaces in your home. For many Austin homeowners—especially busy professionals—small bathroom remodels are an opportunity to elevate daily routines with comfort, ease, and timeless style.
At Claudia Pakes Design Studio, we believe even compact spaces deserve a high-end, cohesive design that feels intentional from the very first concept to the final installation.

Maximize Space with a Thoughtfully Planned Layout
In a small bathroom, every inch matters. A well-planned layout not only improves flow but also creates a sense of calm and clarity—something busy homeowners truly appreciate.
Strategic updates such as:
shifting fixtures for better movement,
opting for a pocket door, or
choosing a floating vanity
can instantly open up the room. With professional space planning, you get a layout that feels effortless, safe, and visually balanced, while still supporting your daily routines.
Create Airiness with Light Colors & Reflective Surfaces
Light, airy palettes work beautifully in small bathrooms. Soft whites, warm neutrals, and gentle blues or greens help the space feel fresh and open.
Reflective materials—glass, polished tile, metallic touches—carry light throughout the room, making it feel brighter and more expansive. These finishes pair naturally with Austin’s warm climate and the city’s love for clean, modern interiors.
Choose Streamlined, Space-Saving Fixtures
Compact, beautifully designed fixtures can transform how a small bathroom feels and functions. Wall-mounted toilets, slim vanities, and frameless glass showers eliminate visual clutter and bring a contemporary sense of openness.
These design decisions make everyday use feel lighter, easier, and far more enjoyable—perfect for homeowners seeking a refined yet functional look.

Integrate Smart Storage for a Clutter-Free Space
Clutter quickly overwhelms a small bathroom. Smart, integrated storage keeps the room feeling serene and organized.
We often incorporate:
recessed shower niches,
tall custom cabinets,
floating shelving, and
well-planned under-sink storage
to ensure every item has a thoughtful place. Custom storage solutions are especially effective in Austin homes, where unique layouts benefit from tailored design.
Use Modern, Layered Lighting to Enhance the Room
Good lighting changes everything, especially in compact bathrooms. A layered approach—ambient, task, and subtle accent lighting—creates openness and warmth.
Elements like LED backlit mirrors, recessed lighting, and elegant sconces brighten the space without overwhelming it. When lighting is done well, materials look richer, colors feel true, and the overall space feels welcoming and elevated.
Elevate the Design with High-Impact Materials
Because small bathrooms require fewer materials, it’s the perfect opportunity to indulge in premium finishes. Quartz counters, marble-look porcelain, handcrafted tiles, and warm wood elements add personality and a touch of luxury.
A patterned floor, textured tile wall, or thoughtfully chosen statement surface can create the refined, modern look many Austin homeowners love—without stretching the renovation budget.
Upgrade the Shower for an Open, Modern Feel
A beautifully designed shower can instantly modernize a small bathroom. Curbless showers bring a sleek, seamless feel, while clear glass enclosures remove unnecessary visual barriers.
Large-format tiles minimize grout lines, creating an uninterrupted, expansive look. Replacing a traditional tub with a spacious walk-in shower is one of the most effective ways to add comfort, accessibility, and visual openness.
Add Personality Through Thoughtful Decor
Even the smallest spaces can reflect your personal style. Minimalist accessories, warm metallic hardware, simple trays, and sculptural planters can add character without overwhelming the room.
The goal is always the same: a clean, cohesive space that feels refreshing, intentional, and beautiful.

Why Work with a Professional Designer in Austin
Designing a small bathroom requires creativity, precision, and a clear understanding of how to make a compact space feel both elegant and functional. A professional designer brings together layout strategy, material curation, lighting, and custom detailing—delivering a final result that feels effortless for the homeowner.
Claudia Pakes Design Studio specializes in creating spaces that blend aesthetics with everyday ease. From the initial concept to procurement and installation, we handle every detail so you can enjoy a smooth, stress-free remodeling experience.
Conclusion
Small bathroom remodeling in Austin doesn’t have to feel restrictive. With thoughtful planning, elevated materials, and a design-driven approach, even the most compact space can become a refined, refreshing sanctuary.
If you’re ready to transform your bathroom with a tailored, full-service design experience, Claudia Pakes Design Studio is here to bring your vision to life—beautifully and effortlessly. Our full-service design experience takes care of every detail, from concept to install. Book your free discovery call here, and let’s make your dream space a reality.

Finding the Best Interior Designer Near Me: A Practical Guide for a Home You’ll Truly Love
Searching for the best interior designer near me usually starts when you’re finally ready to transform your space maybe your living room needs a fresh vibe, maybe your office is overdue for a modern update, or maybe you’ve just moved into a new home and want it to reflect your personality. Whatever the reason, choosing the right interior designer can feel overwhelming. With so many portfolios, packages, and styles out there, how do you know who is the right match?
This guide breaks down what actually matters when selecting an interior designer, what mistakes to avoid, and how to ensure the person you hire understands your taste, your lifestyle, and your budget.
1. Why Hiring the Right Interior Designer Matters
Great design is not just about aesthetic beauty. When you work with the right designer, you get:
• A space that feels like “you”
A good designer doesn’t push their style on you—they study what you like, how you live, how your space functions, and then bring it all together into a design that feels natural.

• Better use of space
Interior designers understand layout planning, ergonomics, and flow. They make your home not just beautiful, but more functional.
• Access to better materials and craftsmanship
Top designers usually have trusted vendors, carpenters, and suppliers. This means higher quality and better pricing than if you tried to piece everything together yourself.
• Time and cost savings
A designer ensures fewer mistakes, smoother execution, and faster delivery. In many cases, they actually help you save money by avoiding impulsive or incorrect purchases.
If you type best interior designer near me in Google, you’ll see dozens of names but not all of them will give you this full combination of creativity, practicality, and professionalism. That’s why selection matters.
2. Understand Your Design Needs First
Before you even start talking to designers, become clear about what you want. It saves time, prevents confusion, and ensures you find someone whose aesthetic matches yours.
Ask yourself:
● Do I want a simple makeover or a complete renovation?
● Am I looking for modern, minimal, traditional, boho, industrial, or fusion design?
● What is my timeline?
● What is my realistic budget?
● Do I need full turnkey solutions or only design consultation?
Once you have this clarity, you can filter your search for the best interior designer near me much more easily.
3. How to Identify the Best Interior Designer Near You
Here are the main factors that actually help you decide:
A. Check Their Portfolio First
A designer’s past work speaks louder than any advertisement. Look for:
● Variety in styles
● Sense of balance and harmony in their work
● Smart use of space
● Practical storage solutions
● Lighting design capability
● Attention to detail—especially in finishing
If their portfolio instantly makes you say “I want my home to look like this,” that’s a great sign.

B. Read Real Client Reviews
Many people forget this step. Good designers consistently receive positive reviews about:
● Punctuality
● Communication
● Project management
● Budget transparency
● After-service support
Real client experiences reveal a lot that pictures cannot.
C. Evaluate Their Understanding of Your Vision
During the consultation, notice whether they genuinely listen or just try to sell you packages. The best designer near you will ask questions like:
● How do you use your space every day?
● What colours make you feel comfortable?
● Do you prefer natural or artificial lighting?
● How many people live in your home?
● Do you need pet-friendly or kid-friendly designs?
A designer who tries to understand your lifestyle will always deliver better results.
D. Check Their Transparency with Costs
A responsible interior designer gives you clear information about:
● Design fees
● Material costs
● Labor charges
● Timeline
● Payment schedule
Unexpected costs are one of the biggest complaints people have—so make sure everything is documented.
E. Flexibility and Customization
The best designer near you will not force you to choose only modular solutions or standard designs. They should offer custom-made furniture, unique elements, or creative alternatives based on your budget.

4. Common Mistakes People Make When Choosing an Interior Designer
Avoiding these mistakes will save you stress later:
Mistake 1: Choosing the cheapest quote
Interior design is not like buying furniture—cheap usually means poor materials, shortcuts, and compromises. Aim for value, not the lowest price.
Mistake 2: Not checking the experience of the execution team
Sometimes the designer has great ideas but a weak carpentry or civil team. This leads to delays, rework, or poor finishing. Ask who will be executing your project.
Mistake 3: Ignoring communication style
You will be coordinating with your designer for weeks or months. If they do not respond on time or don’t understand your preferences, the experience becomes frustrating.
Mistake 4: Not setting a realistic budget
Good designers work within your budget—but you must know your limitations. A well-planned budget prevents unexpected shocks later.
Mistake 5: Not defining the timeline
Some projects stretch endlessly when timelines are not clearly set from the beginning. Always ask for a tentative schedule.
5. Questions You Should Ask Before Finalizing a Designer
Here are some practical questions that help you confidently decide:
How long will the entire project take?
Do you offer 3D designs before execution?
What is included in your design fee?
Who will oversee the day-to-day execution?
Do you handle civil work, electrical, plumbing, and false ceiling?
What brands and materials do you use?
How do you manage quality checks?
How will you keep me updated during the project?
A truly professional designer will answer these questions confidently and in detail.
6. Signs You’ve Found the Best Interior Designer Near You
You’ll know you’ve found the right person when:
● They understand your vision better than you do
● Their portfolio matches your aesthetic
● Communication feels effortless
● They give honest feedback—not just what you want to hear
● Their ideas feel fresh and practical
● They respect your budget
● They provide a clear project plan and timeline
The right interior designer will make you feel excited, not anxious.
7. Final Thoughts: Transforming Your Space Should Be Enjoyable
Searching for the best interior designer near me is more than just comparing prices or picking someone with a fancy Instagram page. It’s about choosing a creative partner who can understand your lifestyle, your personality, and the emotion you want your space to reflect.
A well-designed home or office can change how you feel every day. It can make you more productive, more relaxed, and more connected to your surroundings.
So take your time, explore your options, and choose someone who understands your dream—and can turn it into a beautiful, functional reality. Book your free discovery call here, and let’s make your dream space a reality.

5 Things to Do Before Starting A Kitchen Design Project
When deciding to update your kitchen there are 5 things you should keep in mind before you embark on this journey.
So it’s time to update your kitchen. Where to start?….When deciding to update your kitchen there are 5 things you should keep in mind before you embark on this journey.
A good kitchen designer should be able to work with you to create the design that will both fit your desires and needs and that squares with your budget. Therefore, an experienced kitchen professional will be key! Here we’ll discuss 5 important things you need to determine prior to contacting your kitchen expert.
1. How much are you willing to spend?
Be honest with your designer about how much you feel comfortable spending on your kitchen design renovation. This helps your designer have a clear direction on what to recommend for your project as far as material and appliance selections go. Now, of course, you may have no clue on how much things cost these days so be open minded as your designer pro elaborates on the current cost of labor, materials and goods. This is a very important conversation to have at the very beginning to ensure a proper design is created that respects your investment level.
At CPDS we spend a considerable amount of time during our on-boarding phase to ensure we understand the scope of your project and then take the time to create a realistic investment proposal for you to approve. Then, and only then can we begin designing your perfect kitchen.
Download our Good, Better, Best kitchen budget samples list to get an idea.
2. How much time and stress are you willing to take on?
Know that kitchen renovations can take anywhere from weeks to a couple of months. Consider what your personal daily demands are and can you add a construction project to that workload?
You may realize that you are so busy with work, life and family that it would be a nightmare for you to be the point of contact for every decision and detail. Or you may decide that now is the time when you have lots of free time in your schedule and are finally ready to take on a kitchen remodel. Or you may be somewhere in between, with a semi busy schedule, but can make the time to be involved in the renovation process. Which ever of those scenarios you fit into, there’s a level of service available to you to help you as much or as little as you need.
FULL SERVICE DESIGN: Most interior designers who specialize in kitchens will offer what we call Full-Service design. This is the most comprehensive level of service to ensure that your design project is as stress free as possible, for you.
The designer takes on all the stress away by providing the design concept, layout, elevations, all material specifications and product/appliance selections. She will handle procurement of all finishes that she has specified and handle them until ready to be installed. She may even recommend a contractor if you don’t already have one. Then together with the contractor, the designer will communicate and work together to ensure that the design is implemented accordingly during the construction phase. The designer oversees all phases of the construction and if problems arise (as they always do), the designer and contractor will figure out solutions together without the need to always involve the homeowners. Of course, if it’s a situation that involves your approval to do something totally unexpected or costly then the homeowners are brought in. But, for the most part, the entire project is handed over to the designer and contractors for them to execute and make all the magic happen on your behalf so you can go about your daily life with minimal disruptions and enjoy a beautifully finished space in the end.
DESIGN-ONLY: Another level of service that might be right for you is getting all the ideas, solutions and all the design specifications from the designer in what we refer to as the Design-Only. This means, you get have a professionally designed kitchen plan and then you’re off to the races on your own. You have more time on your schedule, so you decide to take a more hands on approach - you hire the contractor, show him your design plan, he bids it, you sign on and together, you and the contractor make it happen. This type of involvement on your part requires you to be present and/or available (a lot) to the construction team to answer questions and make decisions that arise out of unexpected circumstances. Together you and the contractor will find a solution. You’ll need to be aware of all the details involved in your design to ensure that the contractor and the subs implement the design as intended.
Read more information about our Full-Service process HERE and about our Design-Only process HERE.
3. What is your design style and preferences?
Now, it’s not absolutely necessary for you to know the exact style you envision for your new kitchen. After all, that’s what designers are for. However, it is necessary for you to know at least what you don’t like so your designer can make sure to cross that off the list. It is extremely helpful to provide a collection of inspiration images from any online source like Pinterest or any print publications.
Here are some things you can think about: Do you like shiny and glossy surfaces or matte? Light and neutral colors or bold contrast? Barstools with backs or without? Casual and kid friendly or dressy and elegant?
You get the point! This should be a fun exercise so don’t let it overwhelm you. At CPDS we have a fun way of helping our clients figure this out and it’s part of our Design Development phase. This ensures we’re all on the same page and that we will deliver a design that is right for you and also compliments the architecture of your house.

Design: Grayscale Design | Photo: Carina Skrobecki
4. How do you use your kitchen?
Think about how you want this space to function for you. Do you cook alone of do you have helpers? How often do you cook? Do you bake often and need a baking station? A coffee station? Is the primary cook very tall or short? You might need taller or lower countertops to accommodate for this. Will you be doing a lot of entertaining with family and friends? Is the kitchen the primary place where the kids hangout to do homework and school projects?
Design: Kasamia Interiors
As you can see there are lots of questions that are unique to you and your family’s lifestyle. A well designed kitchen should meet all your needs and it’s worth spending time thinking about all this prior to starting your kitchen design.
5. Set up a temporary kitchen during the renovation.
You will need to prepare for the disruption that will be caused by your kitchen design project. But with the right planning it is possible to still have your household function smoothly. Think about where you’d like to set up a temporary kitchen in another area of the house. This might be in the dining room, if completely separate from them kitchen. Here you can set up a hot plate, small appliances like a blender, toaster oven, crock pot etc., lots of paper plates and disposable cutlery, a few basic spices and condiments, a coffee and tea station of course. Designate a bathroom sink (or tub) as your washing station for items like pans, blender, spoons etc. This is not a fun picture I know, but it’s very helpful to have a makeshift kitchen so you don’t feel like you have to go out for every single meal for the next 8 weeks. If you have an outdoor kitchen you might decide to schedule your kitchen renovation during the warmer months to make use of the outdoor kitchen as much as possible.
The more organized you are prior to “demo” day, the less frustrating it will be to live through a kitchen remodel. It will all be worth it in the end and you will be so glad you did it!
XX,
Claudia

Top 10 Things To Avoid When Updating Your Living Room
We've all been there. We see the sofa of our dreams, the color is perfect, the fabric is a so soft and it's on sale! We buy it. We bring it home. It wont fit through the door! Hubby takes off the door to give you an extra inch, you angle it and strategically maneuver it through, you position it exactly where you envisioned it - Oh, wait...it's too big!
Well, it's one thing to actually realize it's too big. Most people however don't see it, and they leave it, and continue buying furniture to complete the room that is too big, too small, the wrong shape etc.
Today I'm going to share with you my top 10 tips on what to avoid when furnishing your living room - but this can easily apply for any room in your house really.
Here we go!
1. OVER-SIZED FURNITURE
Ok, you guessed it. Avoid buying furniture that is simply too big for the space. Resist the urge to buy the complete living room set that has the matching sofa and loveseat plus the matching coffee table and two side tables. Really take the time to plan out your living room layout BEFORE you buy absolutely anything. By having a floorplan you'll have a road map of what pieces you need and how big they should be. You will save yourself lots of trouble and money if you take the time to do a little planning first. It is not hard. You can do it. Simply take some graph paper and draw your room to scale. 1 square = 1 foot. Remember to include any windows, doors, fireplace and built-ins. Take note of the dimensions of the furniture you are considering and draw them into your floorplan. You will be surprised at how many times you'll have to re-consider a piece simply because it is not the right scale. And, yes, measure the width of your doors to ensure your stuff will fit :)
If you're feeling ambitious check out this post from A Beautiful Mess that walks you through how to draw a floorplan AND the furniture so you can cut it out and play house!

Image Source: A Beautiful Mess.com
2. SMALL RUG
When I was a Realtor I worked with more Buyers than Sellers. So I've seen my fair share of homes. I can't tell you how many times I walked into a living room where the rug was just the wrong size - usually too small!! DO NOT DO THIS!

Image Source: Google
Most of us living in average sized homes with average sized living rooms will need an 8' x 10' or a 9' x 12', period. Do not even consider the 5' x 7' let alone the 4' x 6'. Just don't do it! A rug so small that only the coffee table goes on it, just looks bad and really serves no purpose except to draw attention to the fact that it's the wrong size. Designers always say that "a rug anchors the space" but what does that mean you ask. In my opinion, a rug in a living room should define the conversation area. If the room is particularly big and the seating arrangement is floating in the middle of the room, then having a large rug where all the legs sit on the rug will be the best option. However, in a smaller room perhaps where you do have a sofa against the wall, then having only the front legs (of the furniture pieces) on the rug is just fine. Be sure to be consistent all the way around with whatever option you choose for your situation - either all legs on the rug or just front legs on the rug. Check out this handy diagram below as a guide!

Image Source: www.ishouldbemoppingthefloor.com
3. PICKING PAINT COLOR FIRST
We are all guilty of this. Even I have done this! We fall in love with a paint swatch, we put it up on the walls and then design a room around that paint color! Then we end up driving ourselves nuts hunting endlessly for the right pillows, accessories and curtains that will match perfectly with that paint color. Well, I learned many, many years ago that paint color is one of the very last things one should select. There are a million and one paint color choices out there, so choosing the right shade of blue for your space AFTER everything else has been selected will not be that difficult, I promise! If you're wondering here's my process in a nutshell: I like to begin by selecting the most prominent pieces - sofa, accent chairs and fabric colors and textures. I feel that that starts to give the room it's style and direction. Then based on that I will select a casegood, coffee table, end tables and lighting. Then I focus on artwork, rugs, window treatments and accessories, and lastly paint.
4. NOT ENOUGH LIGHTING
Lighting is so often overlooked. We simply think that since we have recessed lighting in the room already that no additional lighting is needed. Wrong! In my opinion, lighting in a room is like the jewelry that completes an outfit. Having a nice prominent light fixture can add so much elegance and drama to a room. Additional floor lamps and table lamps can also add the right amount of ambient lighting and romance in the evenings when trying to keep it moody and cozy. Best of all, lighting nowadays is so gorgeous! How can one resist not to use beautiful lighting to complete a room?! I like to keep recessed lights and chandelier on dimmer switches to control the brightness. And don't forget about candles and battery operated candles as a source of lighting too. Having battery operated candles in lanterns or wall sconces set on a timer throughout your house adds such a nice ambiance in the evenings, whether you have company or not. Enjoy those little details!

Image Source: Pottery Barn
5. TOO TRENDY
Don't get too caught up in the trends! If not done right they can make your room look chintzy or like a furniture showroom. This beautiful and luxurious room is perfect for a Z Gallerie, marketing campaign but too trendy for anyone to implement in their home. Once this glam style goes out of style, then you'll have to replace everything!

Image Source: Z Gallerie
A classic, timeless look, with some personal pieces, whether vintage family heirlooms or unique items from your travels, mixed with a few trendy touches is a much fresher approach. You will also end up saving money in the long run. Aim for making your key pieces - sofa, dining table, buffet, casegoods, even a rug - of good quality and classic in style. To add a trendy touch you can select smaller, less expensive pieces like an accent chair in a fun print, or a unique coffee table, an eye catching chandelier or even use an inexpensive rug that makes a statement. Your accessories should be a mixture of classic, personal pieces that tell a story about you, your family and your travels or interests, mixed with a few stylish pieces to keep your room (or entire house) looking updated and in vogue.

Image Source: Pinterest
6. FURNITURE TOO FAR AWAY FROM EACH OTHER
This is one of my biggest pet peeves! Just because there are walls in a room it doesn't mean that you have to put all your furniture against them! This room below has many things wrong with. Let's not go there. Let's stick to avoiding placing furniture against the walls...

Image Source: Google
If you a *blessed* with a large room, use a rug to anchor the space and create a wonderfully intimate conversation area. Place a console table behind the sofa to act as your "wall" and define the space if the space needs it.

Image source: Pinterest
In a smaller space where furniture must be placed against the wall, be strategic in the placing or your sofa by selecting the right scale for the wall and the room. Avoid having the sofa and love seat combo in a small space, instead opt for the sofa and one or two accent chairs and even some fun stools/ottomans for extra seating without taking up too much valuable space.

Image source: Pinterest
7. ANGLING ALL SEATING TO TV
Ok, this one might actually be my biggest pet peeve! This clearly defines the room as a TV watching room. Instead go for the room that says, "this is a fun room for gathering, for conversing with friends, for playing board games, for curling up on the sofa on cold, chilly nights" you get the idea. Give your room a personality that is inviting and cozy, taking the focus away from the big elephant in the room - the TV. Oh, that brings up another point. The size of the TV...hmmm, this one is a little tricky for us ladies to win. The men seem to always want the biggest TV they can find. That's true in my case. My husband would not let that one go and having to deal with a 50" screen in the living room in no easy task. My advice on that is to make the room as pretty as possible, hopefully all the prettiness distracts from the black whole in the wall! Story of my life!
What I love about this room below is that even though there is a pretty large TV in the room, you still have a sofa facing the fireplace, taking away from the importance of TV watching and thus subconsciously giving importance to conversation and gathering. And see, all the prettiness makes you ignore the TV for a bit!

Image Source: Pinterest
8. DRAPERY PLACEMENT
I know we've all been "taught" (by HGTV) to place the rod as high as it can go. But I don't always like this look. Sometimes it works and other times it doesn't! I almost always prefer to divide the space between the top of the window frame and the ceiling (or crown moulding) AND if space permits I like to extend the brackets several inches (about 10”) beyond the window frame, covering just a bit of the window frame. This allows light to still enter the room and gives the illusion that the window is much bigger.
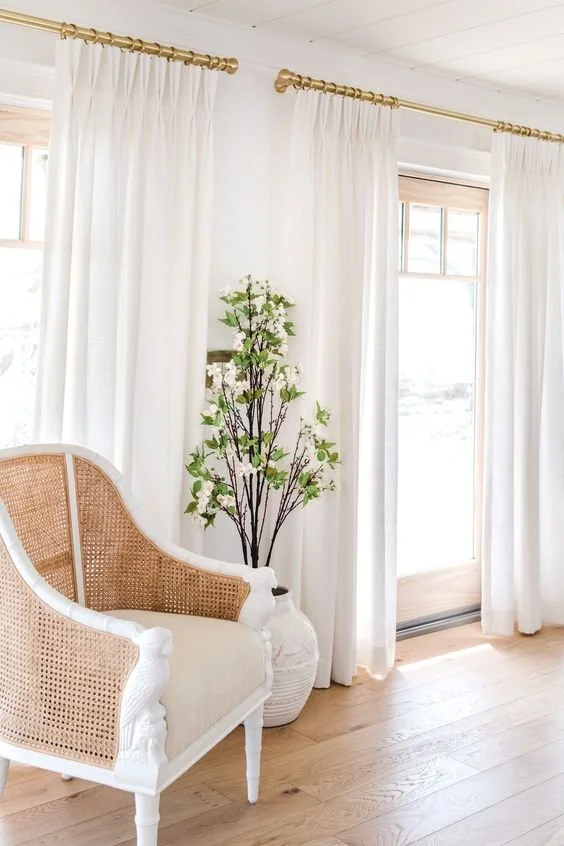
Image Source: Pinterest
Use this diagram to guide you:

Image source: Pinterest
9. ART TOO HIGH OR TOO SMALL
Well this one can be easy to mess up but also easy to fix. Surely you've heard that art should be placed at eye level. Well, eye level for me may not be eye level to you. Most often, I see art that has been placed way too high rather than too low. It's best to aim at placing the center of the artwork around 58-60" high. I also often see art that is just too small for the space. The image below shows art that is too high with a small, teeny tiny piece sitting up there all alone on a big wall with a big sofa... Avoid that please!

Image Source: Google
Take into consideration the size of the wall and the size of the object directly below it. For example, if you have a console table directly below the art piece, I like to keep the art work a few inches smaller than the width of the table. If you have a sofa directly below the artwork on a large wall with tall ceilings for example, then you can select an over sized art piece to make a statement. If your artwork is slightly smaller than you wish It was, a nice trick is to add sconces on either side of the art piece to visually fill in the space.

Image Source: Pinterest
10. TOO MANY SMALL ACCESSORIES
Lots of small accessories of the same scale and height in a room look like dandruff sprinkled throughout. I love using varying scales and heights of accessories to create interest. A good trick is to place smaller accessories on books to give them the height they need next to a bigger object. Also try to stick to grouping of odd numbers, 3 or 5 objects together will look better than 2 or 4.

Image Source: Pottery Barn
If you follow these simple simple rules you will look like a pro and will avoid making costly (and embarrassing) mistakes ;). But, most important of all, have fun when decorating your space. Always make it personal to you, your family and your lifestyle. That's what makes homes so unique and interesting!
XO,